Materials
(Amounts of materials will depend on downspout planter dimensions)
Planter (any sizable container; for the instructions below, the planter size is 3’ x 2’ x 2’)
Pond liner (large enough to line the container with ample slack)
Soil mix: 60% sand, 10% topsoil, 30% compost (Soil volume = area of container x [height – 10 inches])
Pea gravel: Clean washed gravel with no fines (Gravel volume = area of container x 4 inches)
Splash rock / river pebbles (sufficient to cover an area of 12-18 inches in diameter)
Bulkhead Assembly
Recommended Tools: electric drill, 1 3/8-inch drill bit, utility knife, channel lock wrenches, hacksaw, tape measure, ladder, twine, level, survey stakes
Plans
Consult the following plans to design your downspout planter:
Conceptual Downspout Planter Plan
Downspout Planter Install Steps
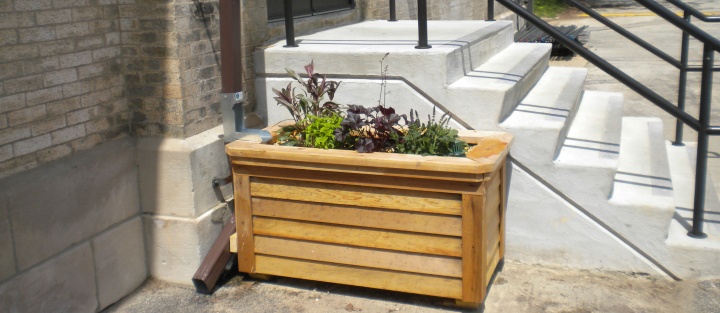
Step 1. Choosing or building a planter:
A downspout planter can be created out of any type of sizable container: a wooden box, barrel, plastic bin, garbage can or watering trough will all suffice.
The size of the planter can vary depending on the amount of roof runoff to be collected.
The size of the planter indicated in the above plans is 3’ x 2’ x 2’.
Step 2. Calculate the size of your rooftop that drains to the downspout:
If you do not have blueprints of your home, you can estimate the area of the rooftop by measuring the area of the roof (length x width). Do not take the roof slope into account.
Calculate the area of rooftop that drains to the downspout you have chosen. If there is only one downspout, you can simply utilize the entire roof area.
If there are gutters with downspouts on both ends, assume that half of the water goes to each downspout.
Step 3. Determine the type of diverter technique you need.
If the downspout collects water from an area 100 square feet or less, it is possible for the planter to handle all of the rooftop runoff (Option 1, shown at right).
If the downspout collects water from an area larger than 100 square feet, it will be necessary to install an inline downspout diverter (Option 2).
The diverter will allow you to limit the flow of roof runoff to the planter.
See the Conceptual Downspout Planter Plan for details and equipment specifications.
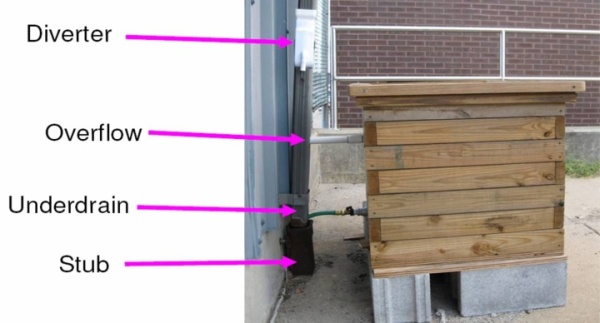
Step 4. Assemble the planter plumbing:
Install an overflow assembly approximately 2 inches below the top of
the planter. It should be located at the back or side of the planter
box. The diameter of the overflow may range from one inch to 3-4 inches.
A smaller overflow can be used with Option 2. With Option 1, the
overflow should be at least as large in diameter as the downspout
itself, in order to allow ample drainage in storm events.
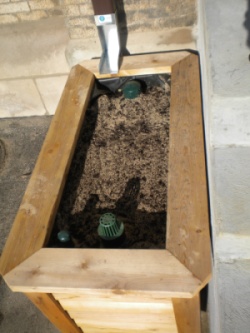
Install wide perforated underdrain assembly approximately 2 inches
above the interior bottom of the planter. The diameter of the underdrain
may range from 5/8 to one inch. Wrap a geofabric sock around the
underdrain.
Both the overflow and underdrain will reconnect to the downspout “stub” that remains after you have cut the downspout (Step 6).
If preferred, the underdrain can be connected to an additional pipe
or soaker hose that drains to a pervious portion of the yard, at least
10 feet from building foundations. This overflow can be used to create a
rain garden or dry well.
See Conceptual Downspout Planter Plan for details on constructing and installing bulkhead assemblies.
|
 |
Step 5. Assemble the planter:
Locate the downspout planter either immediately below the downspout (for Option 2) or within 4 feet of the downspout (Option 1).
Raise the planter high enough off of the ground by utilizing cinder blocks or other materials so the underdrain can drain into the riser stub unless you’re draining the underdrain to an additional pipe or soaker hose that drains to a pervious portion of the yard as mentioned above.
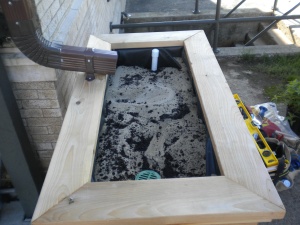
Install pond liner inside of the planter. Allow some slack so that soil and gravel do not stretch the liner as it fills the box.
Install a 4-inch layer of gravel.
Install a piece of filter fabric above the 4-inch layer of gravel.
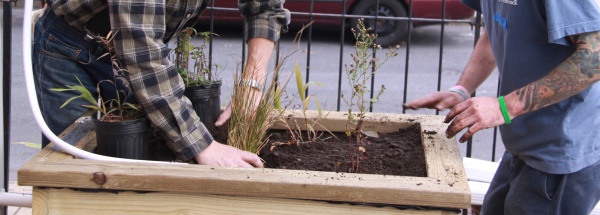
Load the soil mix on top of the gravel and bring the soil surface to approximately 6 inches below the top of the planter.
See Downspout Planter Install Steps for details and photographs of installation.
Step 6. Disconnect the downspout and install downspout diverter:
Option 1: Cut the downspout 2-3 inches above the planter and install
a diverter to allow rainwater to flow directly into the planter.
Option 2: Install an inline downspout diverter that allows partial
diversion of roof runoff. This allows for the diverter to be closed when
not in use (during winter and large storm events).
Install a 2-3 inch layer of splash rock (river pebbles) over the soil covering a 12-18 inch area below the downspout.
Leave the “stub” of the downspout and use this to attach the underdrain and overflow back into the stormwater sewer.
|
|
|
Step 7. Planting:
Select native species that will thrive in moist conditions.
Consult the Conceptual Downspout Planter Plan for a species list.
Water plants immediately after planting and continue to water three times per week during the first two months, and during any period of drought. Wilting plants indicate a need for extra watering.
Step 8. Maintenance:
Keep the overflow free and clear of debris, checking periodically after rainstorms.
Keep the downspout connection (or diverter) connected and directed to the planter.
Follow Downspout Planter: Maintenance and Monitoring.

Disclaimer
This website content is provided to you on an “AS IS” and “WITH ALL FAULTS” basis. You acknowledge that you assume the entire risk of loss in using this information, including without limitation any loss incurred by any End User. You further acknowledge that this content is complex and may contain some nonconformities, defects and/or errors. PWD does not warrant that this website will meet your needs or expectations, or that all nonconformities can or will be corrected. PWD assumes no risk, liability or responsibility for the accuracy of this guide. See full disclaimer