Materials
Measuring tape
Shovel
Saw
Wheelbarrow
Vinyl downspout elbow to fit your downspout
Landscape non-woven geotextile fabric (porous enough to allow water to pass through)
Crushed stone (approximately 1-1 ½ inch in diameter). Wash stone prior to using; use a sieve to remove fine material from stones if necessary. Stone does not have to be very large, but must of a similar size to get maximum amount of void space in the stone while maintaining the structure of the well.
Before starting this project, consult the Dry Well Sizing Chart to ensure that you have enough space to build a dry well and conduct an Infiltration Test to determine whether your soil conditions are suitable.
Step 1: Locate and select your downspout.
The dry well will be directly connected to one of the downspouts on your home in order to capture the rainfall from the roof.
Locate the downspout that you would like to utilize to create your dry well. Make sure the downspout is clean of leaves and other debris.
Keep in mind that the dry well must be located at least 10 feet away from your basement walls and 10 feet away from neighboring buildings.
Call before you dig! It’s the law. Call 811 to determine the location of utility lines on your property at least two days before starting your project.
Step 2: Plan the Dry Well
Determine the size of the well, using the Dry Well Sizing Chart.
Determine the volume of crushed stone you will need. Volume of Stone = Dry Well Area x 1.5 feet
The dry well should have a safe overflow, such as an overflow to your yard drain. In larger storms, your dry well will fill up, and you need to make sure that the overflow doesn’t damage your property or your neighbors’ properties. Keep in mind that the yard drain has to be slightly downhill from the dry well.
The dry well should be at least 10 feet from your house and any other buildings that are level with yours. It should be at least 25 feet from buildings that are downhill from the dry well.
Step 3: Disconnect and modify your downspout.
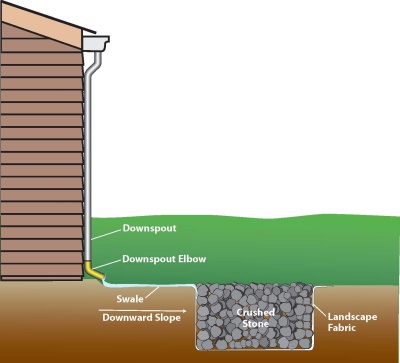
Cut your existing downspout close to the ground using a saw so that a vinyl downspout elbow can fit over the disconnected downspout (usually 3-4 inches).
Adjust the elbow so that it aims the stormwater runoff into a swale.
Consider installing a hinged downspout elbow and enclosed extension that can be flipped up against the house during dry weather or lawn mowing. The extension must be enclosed.
Follow these Downspout Disconnection Instructions for more information.
Step 4: Dig a swale.
A swale is a small channel or ditch that will collect the runoff from the downspout and carry it to the dry well.
The swale should be just a few inches deep and wide and slope downward from the disconnected downspout to the dry well location.
Seed and mulch the swale so that water traveling from the downspout to the dry well does not cause erosion.
Step 5: Dig the dry well.
After determining the size of the dry well using the Dry Well Sizing Chart, dig the dry well to the appropriate size.
Line the well with landscape fabric (non-woven geotextile fabric or filter cloth). Make sure it is porous enough to allow water to pass through it. Excess fabric should be folded over the edges of the well.
Fill the well with crushed stone. The well can either be entirely filled with stone, or a few inches can be left at the top, then covered with a layer of geotextile fabric, filled in with soil, and planted. The dry well can also be topped off with larger decorative rocks. Dry wells should be inspected at least four times annually as well as after large storm events.
For more information:
Dry Well Overview
Disclaimer
This website content is provided to you on an “AS IS” and “WITH ALL FAULTS” basis. You acknowledge that you assume the entire risk of loss in using this information, including without limitation any loss incurred by any End User. You further acknowledge that this content is complex and may contain some nonconformities, defects and/or errors. PWD does not warrant that this website will meet your needs or expectations, or that all nonconformities can or will be corrected. PWD assumes no risk, liability or responsibility for the accuracy of this guide. See full disclaimer