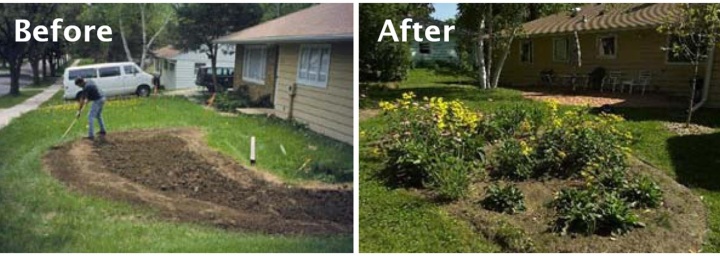
Photo: Portland Water Department
Rain Garden Preparation
Infiltration Test
Before developing a rain garden, it is essential to determine whether the soil conditions in your yard are adequate for a rain garden. Conduct an Infiltration Test to determine your soil’s suitability.
Downspout Disconnection
Rain gardens can be constructed on their own to absorb rainwater from the surrounding environment, or they can be directly connected to roof runoff via the downspout.
Here are a few rules of thumb to determine whether you can connect your downspout to a rain garden:
The rain garden must be at least 20% the size of the total roof area in order to absorb all runoff and prevent flooding issues.
Downspouts must drain at least 10 feet from basement walls and 2 feet from crawl spaces and concrete slabs.
The end of the downspout must drain no fewer than 5 feet from your property line, and at least 10 feet from neighboring buildings.
Plans
You can use these model rain garden designs provided by PWD for your own project:
Single-Family Home Rain Garden Plan
Twin / Townhome / Rowhome Rain Garden Plan
How to Build a Rain Garden
Materials
Hose, rope or string
Level
Shovel or spade
Measuring tape
Humus or other soil amendments (optional)
Downspout extension (also optional)
Plants for the garden (See list below.)
Step 1: Locate and select your downspout
Your rain garden will be directly connected to one of the downspouts on your home in order to capture the rainfall from the roof.
Locate the downspout that you would like to utilize to create your rain garden.
Keep in mind that the rain garden must be located at least 10 feet away from your basement walls and 10 feet away from neighboring buildings.
Call before you dig! It’s the law. Call 811 to determine the location of utility lines on your property at least two days before starting your project.
Step 2. Determine the size of your rooftop that drains to the downspout
If you do not have blueprints of your home, you can estimate the area of the rooftop by measuring the area of the house (length x width). Do not take the roof slope into account.
Calculate the area of rooftop that drains to the downspout you have chosen. If there is only one downspout, you can simply utilize the entire roof area.
If there are gutters with downspouts on both ends, assume that half of the water goes to each downspout.
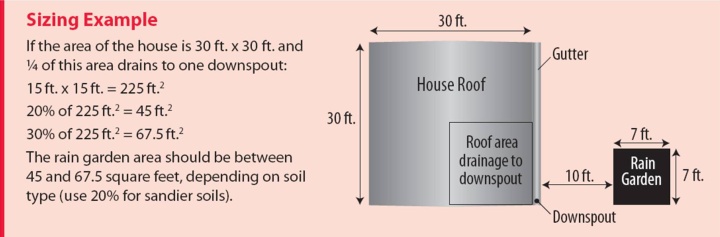
Step 3. Calculate the size of your rain garden
The rain garden must be between 20% and 30% the size of the total roof area. See the Sizing Example below.
Once you have determined the appropriate size of the rain garden, use a rope to lay out the boundary of the garden.
If you do not have enough space to develop a rain garden that will absorb all the water from the roof, you can still build the rain garden; however, it should not be connected to the downspout. If you locate the rain garden at the lowest point of the yard, it will still serve its purpose of collecting rainwater and reducing stormwater runoff.
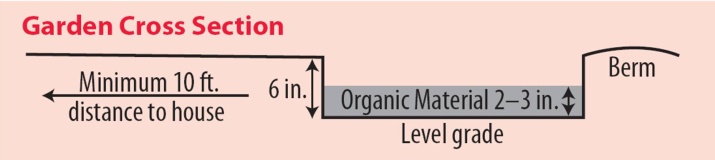
Step 4. Designing the rain garden
Create the garden at the lowest point of your yard, at least 10 feet from both your home and neighboring homes.
Keep in mind that you will want to either connect the downspout directly to your garden or build a shallow ditch or swale to carry the water from the downspout endpoint to the garden. If the latter is true, maintain a 1% slope from the house down to the rain garden.
If your yard drain is also located in this area, you can build the rain garden around the drain. The bottom of the rain garden should be a few inches lower than the drain.
Step 5: Dig the rain garden
Dig a hole 3-4 inches deep across the entire surface of the rain garden.
If the soil lacks organic material, you can improve it by digging 5 inches deep and adding 2-3 inches of hummus or compost to the bottom of the rain garden.
Make sure the bottom is level and there is a gentle slope from the ground level to the bottom around the edges.
Use the remaining soil to build a berm surrounding the garden.
Step 6. Test the garden
Test how the garden will hold water during a storm by letting water flow into the rain garden from a hose placed at the downspout.
Based on this test, make any necessary adjustments. For example, if the garden overflows in a particular direction, increase the size of the berm on that side.
Step 7. Disconnect your downspout
Cut your existing downspout close to the ground using a saw so that a vinyl downspout elbow can fit over the disconnected downspout (usually 3-4 inches).
Adjust the elbow so that it aims the stormwater runoff into a swale.
Consider installing a hinged downspout elbow and enclosed extension that can be flipped up against the house during dry weather or lawn mowing. The extension must be enclosed.
Follow these Downspout Disconnection Instructions for more information.
Step 8. Add plants to the rain garden
Utilize the chart below to choose native plants that won’t require much watering, can withstand wet soils, and will work well in the amount of sun or shade that your garden receives.
It’s helpful to draw out a planting plan before you start, and mark planting areas within the garden with string.
Step 9: Maintain the garden
Water plants regularly until they become established. Afterwards, they should need little to no additional watering.
Weed and prune as you would any garden.
Do not be afraid to move plants around if you think they would do better in drier or wetter parts of the garden.
Your garden may need a bit more maintenance than a lawn in the beginning, but in the long run it will be easier to care for and provide many added benefits!
| Plant |
Form |
Sun/Shade* |
Moisture* |
Color |
Height |
Butterfly weed (Asclepias tuberosa)
|
Flower |
FS/PS |
D-M |
Orange |
1'-3' |
Swamp milkweed (Asclepias incarnata)
|
Flower |
PS/PS |
M-W |
Pink |
4'-6' |
Cardinal flower (Lobelia cardinalis)
|
Flower |
FS/PS/S |
M-W |
Red |
2'-4' |
Great blue Lobelia (Lobelia siphilitica)
|
Flower |
FS/PS/S |
M-W |
Blue |
1'-5' |
Bee balm (Monarda didyma)
|
Flower |
FS/PS/S |
M-W |
Red |
2'-5' |
Blazing star (Liatris spicata)
|
Flower |
FS/PS |
D-M |
Purple |
1'-6.5' |
Blue flag (Iris versicolor)
|
Flower |
FS/PS |
M-W |
Purple |
3'-5' |
Tussock sedge (Carex stricta)
|
Flower |
FS |
M-W |
Green |
1'-3.5' |
Black chokeberry (Photinia melanocarpa)
|
Shrub |
FS/PS/S |
D-W |
White flower, black fruit
|
3'-6' |
| Spice bush (Lindera benzoin) |
Shrub |
PS/S |
M-W |
Red fruit/Yellow in fall |
6.5'-18' |
*Sun/Shade: FS = Full Shade, PS = Partial Shade, S = Shade
*Moisture: D = Dry, M = Moist, W = Wet
For More Information
How Do Rain Gardens Work
Rain Garden Alliance Plant List
Disclaimer
This website content is provided to you on an “AS IS” and “WITH ALL FAULTS” basis. You acknowledge that you assume the entire risk of loss in using this information, including without limitation any loss incurred by any End User. You further acknowledge that this content is complex and may contain some nonconformities, defects and/or errors. PWD does not warrant that this website will meet your needs or expectations, or that all nonconformities can or will be corrected. PWD assumes no risk, liability or responsibility for the accuracy of this guide. See full disclaimer